AWS SES: Getting Started with Serverless Email Processing
Published: 2023-04-24I have started a couple of projects which use email processing. One was to process email receipts I was receiving from other services, and the latest was to trigger batch processing jobs via email. Why email? Well in one case it was convenient because the input data was already an email, and in the other I figured that emailing a simple request would be faster to prove the concept than writing a webpage, when I didn't know if in the long run I would need a webpage or not.
I learnt a few things in setting these projects up - some things are simply part of setting SES up and others were because I wanted to think a little outside the standard AWS/Serverless box.
In this article, I'll go through how to set up basic lambda processing of emails using SES, Cloudformation and Serverless.

SES setup
First we need to set up receiving emails, which is done with SES. In order to capture incoming emails you will need:
- An email identity in SES
- An email address and DNS rule
- A rule for what to do with the email when you get it
In this section we will go though these.
Domains
First a word on domains. To receive email through a 'real' email address you will need a domain. There are two ways to purchase domains in relation to this article: either in AWS Route53 or externally. I have done both and so I will describe both. In some ways external domains are better and in some ways Route53 ones are better. After experiencing both I will probably usually go with external domains but in some cases I will pick Route53. As with many engineering choices, it depends on the needs of the project or product.
Common SES Setup
To receive and process emails with Amazon SES, you will need the following:
- A verified email identity
- A SES rule set
- A SES rule for incoming email
The rule set and its associated rules can be built with Cloudformation but the email identity cannot. In order to do this, go to the AWS SES dashboard and then to the 'Verified Identities' section. From there click on 'Create Identity', to see the following form.
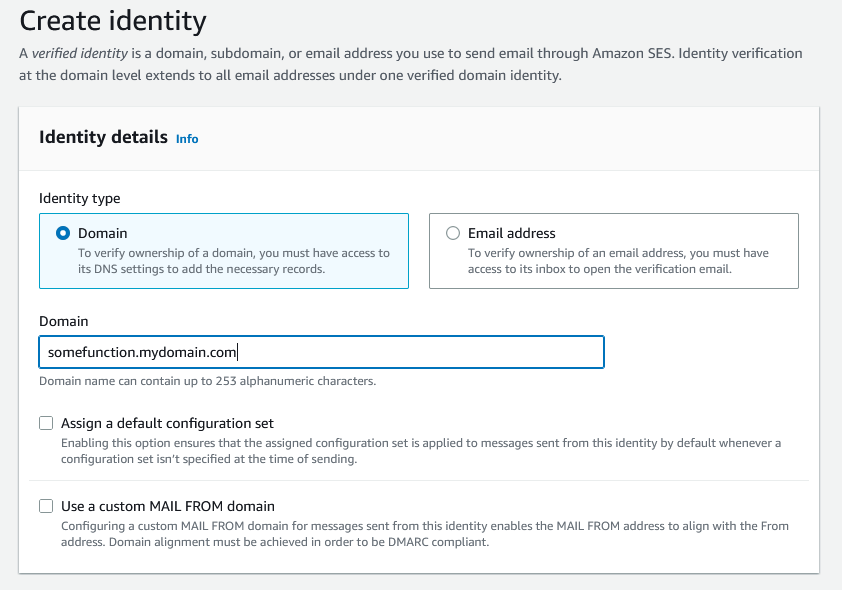
AWS have updated their domain verification to only use DKIM, and if you have a domain with Route53 then you can check a box to automatically publish the records to your hostedzone, which is great. This means that you don't have to put anything in to Cloudformation, but it does mean that these changes are not version-controlled in any way, which may or may not suit you.
Setting up email with Route53
So you have a Route53 domain. This is great for Infrastructure-as-code as you can specify your configuration in a Cloudformation stack which means it is easy to version-control and re-deploy if necessary.
Configuring Route53 to handle receiving emails only requires a few fairly simple Cloudformation resources:
- A Route53 Hosted Zone
- An incoming email MX record
A Cloudformation example of this is below:
Resources:
  MyHostedZone:
    Type: AWS::Route53::HostedZone
    Properties:
      HostedZoneConfig:
        Comment: "Domain registered with AWS"
      Name: "mydomain.com"

  # Forward email to us-west for SES processing
  IncomingEmailRecord:
    Type: AWS::Route53::RecordSet
    Properties:
      HostedZoneId:
        Ref: MyHostedZone
      Name: "somefunction.mydomain.com"
      Comment: Incoming email record for sub-domain
      Type: MX
      TTL: 900
      ResourceRecords:
        - "10 inbound-smtp.us-west-2.amazonaws.com"
It is at this point that you should be aware of the limitations on SES services. SES is only available in some regions, and that list of regions is even smaller for handling incoming email. As of writing this article, those regions are as follows and are described here:
- US-East-1 (N. Virginia)
- US-West-2 (Oregon)
- EU-West-1 (Ireland)
In order to receive and process emails, it is best to set up your infrastructure here, however because buckets are global you can probably have lambdas and downstream storage hosted in another region if that is beneficial, but it will make deployment and management more complicated.
You will see that the RecordSet item refers to a subdomain. I prefer to do this so that various functions which share processing requirements are grouped under a subdomain. Root domains can be left for general things like sending actual service-related emails.
DKIM Keys
Before enforcing DKIM, AWS used to require you to add a TXT record to your Route53 setup yourself, but as mentioned above that is no longer necessary. Keeping these keys out of Cloudformation also means there is less security overhead and risk; this type of information is best kept out of 'source' files, and handling them can be a pain. On the other hand it does mean that if you need to re-build your domain you will need to re-configure and verify your email identity manually.
External DNS
If you have an external DNS, you will need to add the DKIM keys by hand. This is straightforward but you should follow any guidance provided by your DNS provider.
The MX record must also be entered by hand, and is typically a record with the following information:
- Type: MX
- Name: somefunction.mydomain.com
- Priority: 10
- Target: inbound-smtp.us-west-2.amazonaws.com
The fields will vary from service to service.
Once the DKIM and MX records are set up, if they are correct then you should receive an email through your AWS account to say that verification is successful. If not, check the SES dashboard periodically.

SES Rules
Now we can move on to the SES rules. This is required to inform AWS what to do with an email that it receives. Setting up a rule requires you to define a rule set and also define rules within that set.
A common example is to simply store the incoming email so that you can process it later. In Cloudformation this looks like this:
  EmailReceiptRuleSet:
    Type: AWS::SES::ReceiptRuleSet
    Properties:
      RuleSetName: 'my-email-rule-set'

  EmailRule:
    Type: AWS::SES::ReceiptRule
    Properties:
      RuleSetName: !Ref EmailReceiptRuleSet
      Rule:
        Name: 'my-incoming-email-storage-rule'
        Enabled: True
        Recipients:
          - somefunction.mydomain.com
        Actions:
          -
            S3Action:
              BucketName: !Ref EmailStorageBucket
              ObjectKeyPrefix: "IncomingEmail/"
    DependsOn: EmailBucketDataStoragePolicy
This should be straightforward to understand: The ReceiptRuleSet is simply a container, and the actual rule instructs AWS to store any email addressed to somefunction.mydomain.com to be stored in the referenced storage bucket under the prefix IncomingEmail/. This acts as a kind of folder in S3.
You will notice that there is a reference to an EmailBucketDataStoragePolicy. This is important as you need to allow SES to be able to write to your bucket. This will look something like this:
  EmailBucketDataStoragePolicy:
    Type: AWS::S3::BucketPolicy
    Properties:
      Bucket: !Ref EmailStorageBucket
      PolicyDocument:
        Statement:
          -
            Sid: "AllowSESPutObject"
            Effect: "Allow"
            Principal:
              Service: "ses.amazonaws.com"
            Action:
              - "s3:PutObject"
            Resource: !Join
              - ''
              - - !GetAtt EmailStorageBucket.Arn
                - '/*'
This Bucket Policy allows SES to perform s3:PutObject on the referenced bucket. Without this, you will be faced with some hard-to-diagnose permission problems.
(I haven't included the resource for the actual S3 bucket here - that should be a straightforward exercise for the reader)
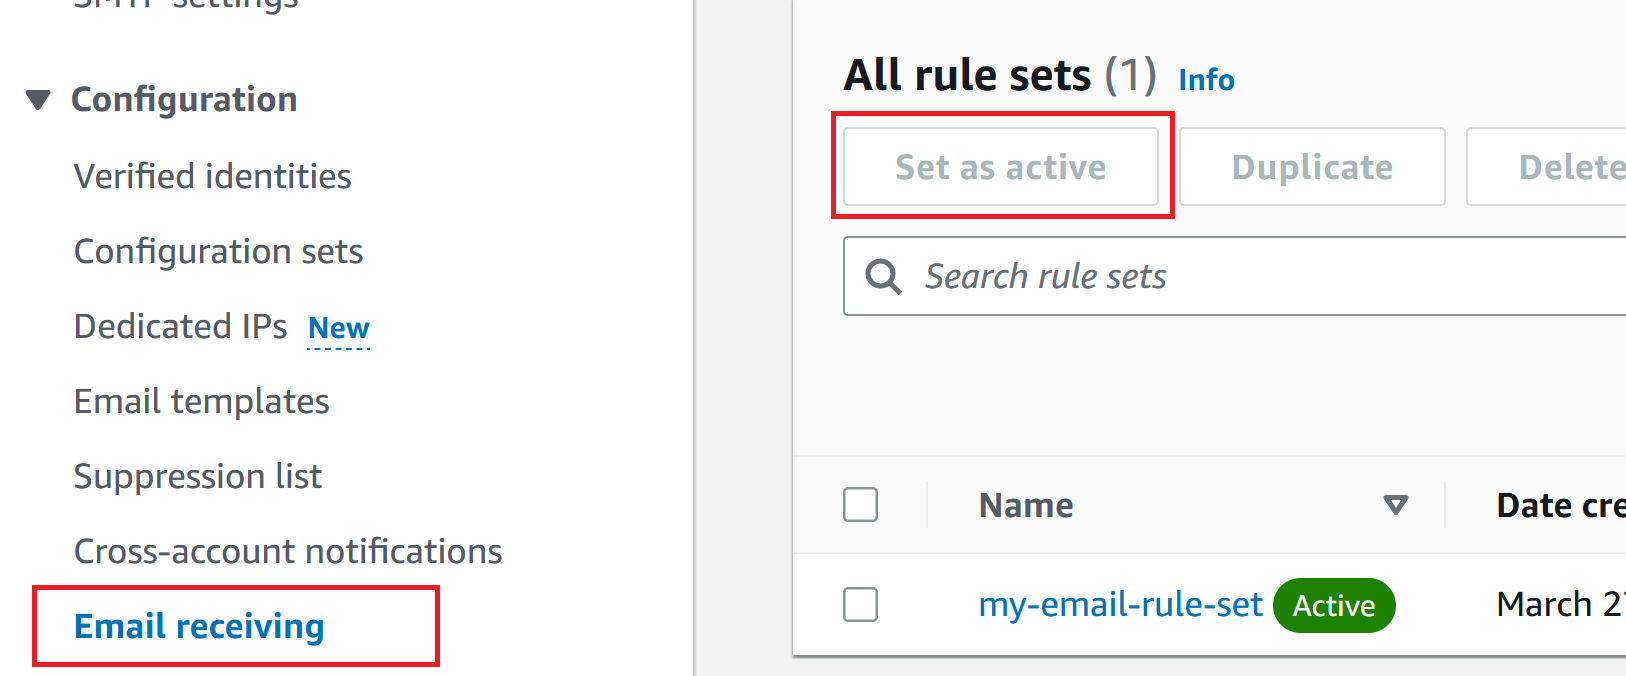
Gotcha: Enabling the RuleSet
One thing that is a bit hard to find in the documentation is the fact that you need to manually enable the ruleset. You can enable the rule in Cloudformation but the ruleset must be enabled through the console. To do this, go into the 'Email Receiving' menu item, select your ruleset and enable it.
Lambda Setup
This is all the infrastructure set up - we now have:
- A domain which sends email to AWS servers
- A bucket to store the emails (set up separately)
- A SES rule which listens to incoming mail and writes it to the bucket
Now we need to process it.
Readers should note that you don't have to write to the S3 bucket first, you can configure the rule to invoke a lambda function straight away, but I find it is useful to store the email anyway. So now we will trigger a lambda from when the email is stored to S3.
Serverless
I like using the Serverless framework. I just think that it makes things nice and easy and minimises what you need to do to get a lambda up and running.
We do need to do something though, and the basics are this:
- Set up the provider details
- Make sure we have a deployment role
- Give our lambda some permissions to access S3
- Define the function and the trigger event
Item 1 can be done when you set up your Serverless project, and all the info you need is on the Serverless tutoral page.

Deployment Roles and Permissions
Assigning the role and permission is probably the trickiest thing. All the big cloud providers implement some kind of security model, which is a good thing. It's just up to us to use it!
If you run through the Serverless setup, it will allow you to deploy using your local access keys, but this is not typically recommended. I generally provide a role for Serverless to assume, which restricts what it can and can't do. Setting it up is a bit cumbersome but it means you have full control over the permissions.
At minimum, it needs to:
- Be allowed to assume Cloudformation and Lambda roles
- Be allowed to pass a role to another service
- Be allowed to perform certain functions on your resources
A little explanation of the above points:
- is in order for Serverless to actually perform the deployment and create your resources
- is a special case, which will be explained soon
- is so it can perform actions on your resources
Because Serverless prefixes your project's services with the service name, I typically write the IAM PolicyDocuments to be limited to only those resources, which looks like this:
  ServerlessDeploymentRole:
    Type: AWS::IAM::Role
    Properties:
      RoleName: My-Serverless-Deploy-Role
      AssumeRolePolicyDocument:
        Version: 2012-10-17
        Statement:
          - Effect: Allow
            Principal:
              Service:
                - 'cloudformation.amazonaws.com'
                - 'lambda.amazonaws.com'
            Action:
              - 'sts:AssumeRole'
      Policies:
        - PolicyName: ServerlessDeployPolicies
          PolicyDocument:
            Version: 2012-10-17
            Statement:
              - Effect: Allow   # Allow S3 actions to buckets with service prefix.
                Resource:
                  - 'arn:aws:s3:::service-prefix*'
                Action:
                  - 's3:*'
              - [More permissions...]
A Special Case
I usually make an architectural decision to separate the incoming email infrastructure with the business logic in the lambda code. You don't have to do this, but I do it for two reasons:
- Serverless is not great at handling resources that are not tightly coupled to your lambdas. It does allow you to add custom resources at the end of your
serverless.ymlfile, but this is typically just Cloudformation code anyway, and brings us to the next point... - The email pipeline should be a more permanent fixture, and shouldn't be tightly coupled to the Serverless deployment in my opinion. If you want to tear down and re-deploy your lambdas, if your email pipeline is managed by the
serverless.ymlfile then it will be torn down as well. I think it is better to de-couple them.
Because of this, Serverless needs to be told that you have a pre-configured S3 bucket and it needs to run some custom lambdas to be able to access it. In order to do this, the following policy needs to be added to the ServerlessDeploymentRole:
  MyServerlessDeploymentRole:
    # Existing stuff...
      Policies:
        - PolicyName: CustomResourceLambdaRole
          PolicyDocument:
            Version: 2012-10-17
            Statement:
              - Effect: Allow   # Allow all IAM actions to roles prefixed with service
                Resource:
                  - !Sub 'arn:aws:iam::${AWS::AccountId}:role/My-Serverless-Deploy-Role'
                Action:
                  - 'iam:PassRole'
In essence, the role needs to be allowed to pass itself to another service. This is required so it can install and run a custom lambda to be able to configure your existing S3 bucket. (Once again, if you are happy to let Serverless handle your S3 bucket as well then you won't have to do this.)
Finally, this role must be named in your new serverless.yml file:
provider:
  name: aws
  # Your provider configuration...

  # AWS IAM specifications here
  iam:
    deploymentRole: arn:aws:iam::${aws:accountId}:role/My-Serverless-Deploy-Role
Lambda Permissions
Next we have to grant permissions to the lambda that we are going to create. It will need to be able to read the email that has been stored in the S3 bucket, so we will need to access the ARN of the bucket you are using. In the provider/iam section of the serverless.yml, add the following:
provider:
  # AWS IAM specifications here
  iam:
    role:
      statements:
        # Allow access to S3 objects
        - Effect: "Allow"
          Action:
            - "s3:ListBucket"
          Resource:
            - # Put S3 ARN here
        - Effect: "Allow"
          Action:
            - "s3:GetObject"
          Resource:
            - Fn::Join:
              - ''
              - - # Put S3 ARN here
                - "/IncomingEmail/*"   # Matches the SES rule action
There are a few ways to reference the S3 ARN. I like to export it from the Cloudformation and then reference it in serverless.yml using ${cf:stack-name.output-name}, but you can do all kinds of funky stuff with Serverless variables to make sure you don't repeat yourself.
One important detail is to make sure that the permission you grant to read from matches the location that you configured to write your email to in the SES rule. Once again, there are probably some tricks you can do to make sure these are synchronised.
![]()
Make the function
Finally, we can make our function! The contents of the function is out of scope of this article, but I will say that it is worth reading the Python Email Parsing Library Documentation. It undoubtedly contains information you will need if you are writing in Python. (There are NPM email-parsing packages for Javascript, but I like the fact the Python one is built-in).
The final thing to do is configure the lambda in serverless.yml:
functions:
  email_processor:
    handler: handler.process
    events:
    - s3:
        bucket: # Put bucket name here
        event: s3:ObjectCreated:*
        rules:
          - prefix: IncomingEmail/
        existing: true   # We are using an existing bucket
There are three important things to note here:
- You need to supply the bucket name to the s3 event, NOT the bucket ARN. This usually trips someone up.
- Make sure the S3 object prefix matches the SES rule. (Of course you don't need to use a prefix, but I think it is more informative)
- Because we are using an external S3 bucket, we must specify
existing: true. (Reminder: if you have chosen not to manage your own bucket then you don't need this and Serverless will create it for you, BUT tearing down the function will also delete the bucket.)
Wrap Up
It may not seem simple but there is not that much to do in order to capture emails in AWS, and there are many applications. Once capturing and processing is done, SES can be configured to send emails as well. There are probably many applications which can be bootstrapped into a POC using email instead of building and deploying a website, and some users will find interacting through emails much easier anyway.
So go forth and keep email alive!